
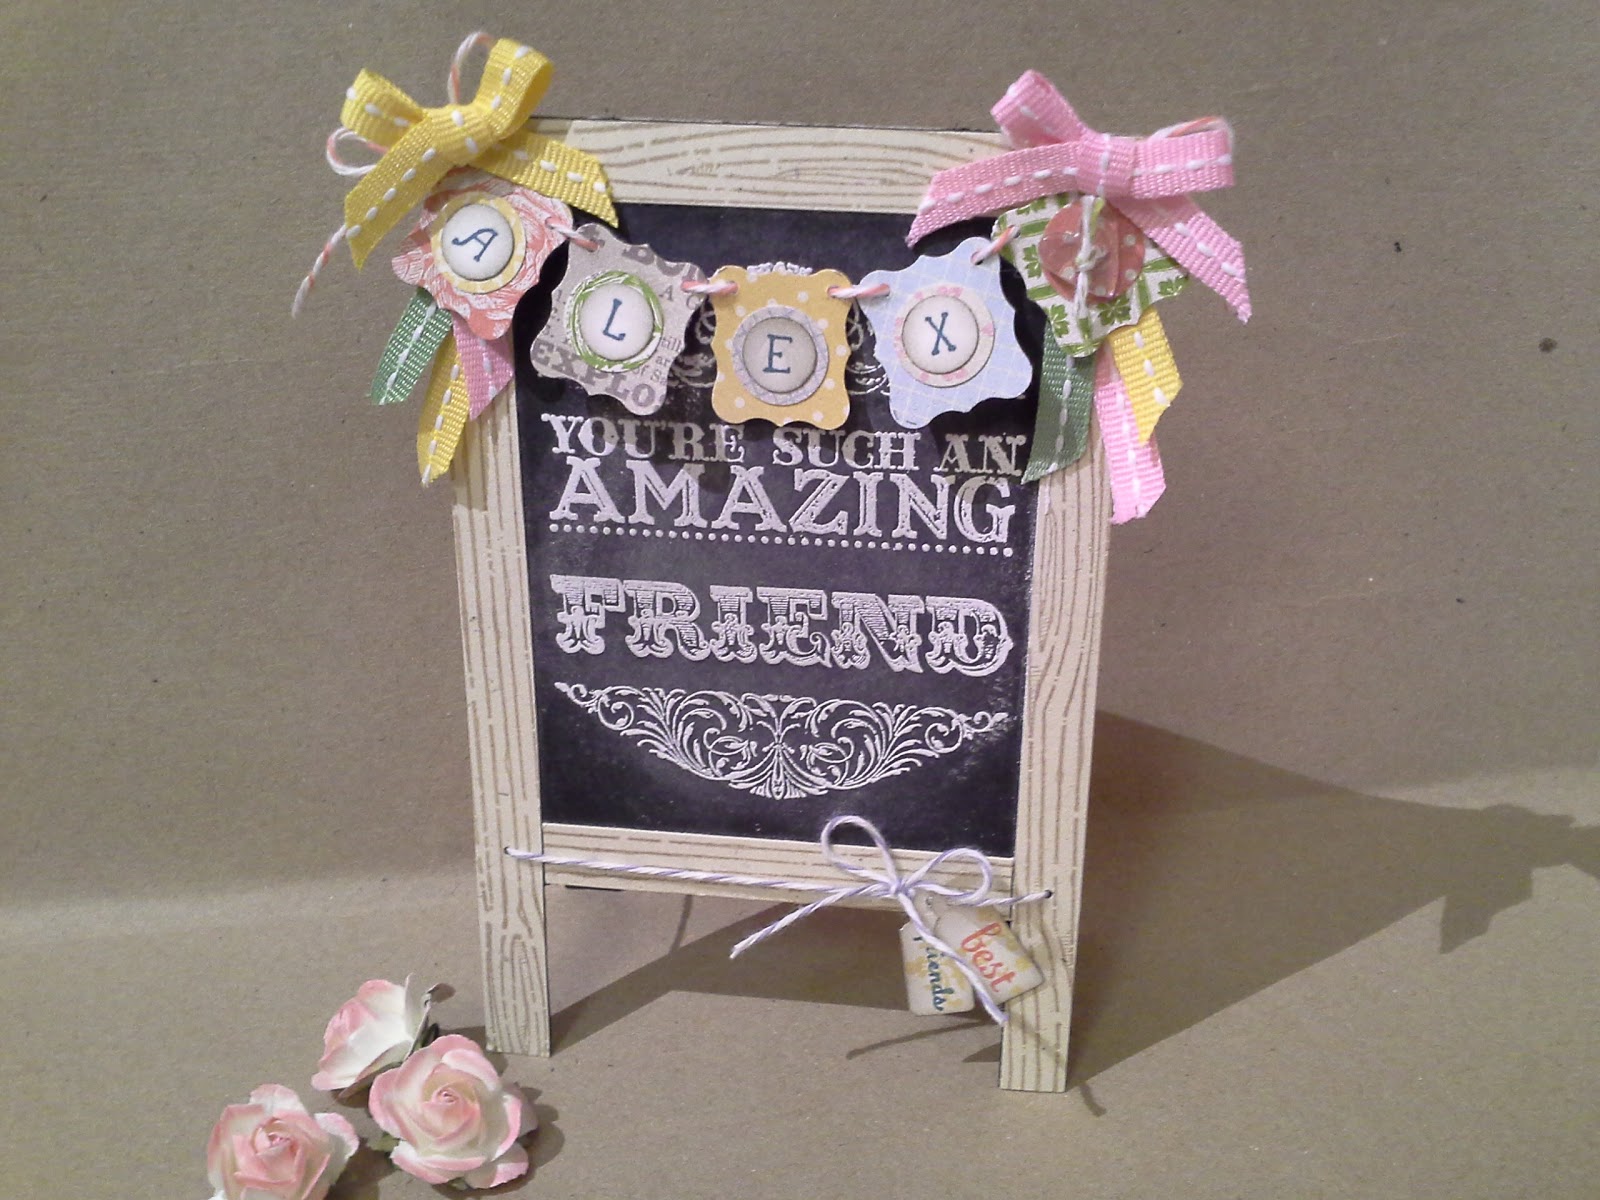
Little Chalkboard
This is a Little Chalkboard Card I made which can be adapted to suit so many occasions.
The card will fit very nicely inside the Stampin' Up new medium sized envelope though
you could easily alter the size to fit your requirements.
I have upon request tried my best to give measurements to help you make your own
Little Chalkboard Card but this is the first time I have posted instructions so please email me
if you require any more information.


The card measures 28cm x 9cm. Score at 14cm and fold in half.
The Blackboard part of the card measures 7cm x 9cm and the
wood frame is made from 1cm strips, four of which are 14cm long
and four which are 7cm long.

The long 14cm strips form the vertical uprights of the board and are glued
to the outside edges of the card.
The smaller 7cm strips form the horizontal cross member pieces and these are glued
one at the top and at 10cm further down on the front and back of the card.
This will leave a small rectangle at the bottom of the
card (3cm x 7cm)
of both sides which is to be cut out and discarded.
I have used the 1/16th" (2mm) Circle Handheld Punch
to punch a hole in the middle of all four of the 1cm uprights at
10.5 cm down to thread either Linen Thread or Bakers Twine.

Here is a list of Stampin' Up items I have used to make my Little Chalkboard Card not including the bunting/banner across the top:
New Stampin' Strimmer
Basic Black Card
Naturals Ivory Card
Classic Stampin Pad: Crumb Cake
Stampin' Emboss Powder: White
Heat Tool
Stampin' Around Wheel: Timber
Stamp-a-ma-jig (my hero product)
Embossing Buddy
Stamp Set: Amazing Family
Tombo Glue
Scissors
Linen Thread or Bakers Twine
You can use any stamp set that will fit the dimensions above or adapt it as I have done
for other projects.
There are so many ways to embellish it, I have used the Petite Curly Label,
which you can have free by placing an order of just £45.

I have used the Stampin' Around Wheel 'Timber' seen above on the
right but you can also use the large 'Woodgrain' Stamp.
I hope this has been of some help if you want to make one of these Little Chalkboard Cards.
Great job on your first tutorial! Thanks so much for taking the time to share this!
ReplyDeleteThis is just the most precious lil' chalkboard! Clever idea and thanks so much for sharing *Ü*
ReplyDeleteThanks so much for sharing your tutorial, Angie! And I love your blog - fabulous creations :)
ReplyDeleteThis awesome Angie! Thank you for your instructions. Keep up the good work with your blog. I shall visit again for sure. Vx
ReplyDeleteThank you, Angie, for posting your instructions. they are well written and easy to follow! I've sent the link to my friends and we'll have lots of little chalkboard easels! The hardest part will be converting the cm to inches (LOL) as Canada is a half-and-half metric country, and I'm old enough to only think in inches! thanks again.
ReplyDeleteHi angie I have just found your blog and I love it! I'm new to blogging too! Keep up the fantastic work x
ReplyDeleteDonna xx
Angie you do me proud hun...this is gorgeous and you're really taking to the blogging keep up the fantastic work c u sat xx
ReplyDeleteThanks for the instructions Angie they are so easy to follow. I keep looking at my cute little blackboard I got as a swap yesterday.
ReplyDeleteSharon x
Love this project and so lucky to receive one as a swap at training yesterday, thanks so much. x
ReplyDeleteWhat a WOWZER card Angie, thanks soooooo much for sharing your time to do the tutorial which is fabulous by the way and your talent...
ReplyDeleteKim x
A super card. Thanks for sharing. Anne x
ReplyDeleteSo happy to already have an original !! But I think you knew that at the time of swapping.... As I picked my jaw up off the floor...... love love love this card!!! Best chalkboard/easel card ever!! And here is a tutorial too..... Wow thank you so much... This is definitely in my have to do list... Right at the top! Can't wait....... Thank You SO much.......
ReplyDeleteThis is fab!! Just have to have a go at one of these
ReplyDeleteMargaret x
Thanks for all the wonderful comments, just a little tip for threading the bakers twine and linen thread. I used a little tea light (though any candle will do) and dipped the end of the twine/thread in the melted wax, it sets/hardens in seconds and the threading should now be a doddle. hope this helps. x
ReplyDeleteAwesome card. Thank you for sharing the card and a tutorial! can't wait to make one.
ReplyDeleteThat is so cute! I can't wait to make one for my BF, thanks for the tutorial!
ReplyDeleteSo adorable! Thank you so much for sharing! I cannot wait to make one!
ReplyDeleteThis is just SO STINKIN CUTE!! Thank you for sharing! I have featured it on my blog as well!
ReplyDeletehttp://stamprightup.wordpress.com/2013/03/13/541/
Wonderful tutorial Angie. Thank you for the pictures and the measurements (offering both sets of measurements was a wonderful bonus!). Can't wait to make my own.
ReplyDeleteHugs from Oregon in the U.S.
I used your beautiful card as inspiration for a big one of my own. I'll be posting it on my blog later this morning. Thanks x
ReplyDelete